Overview
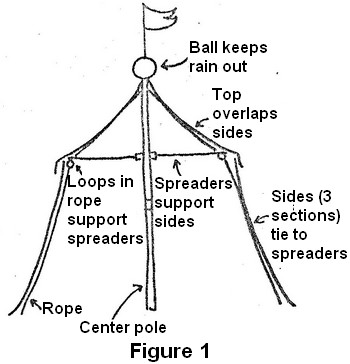
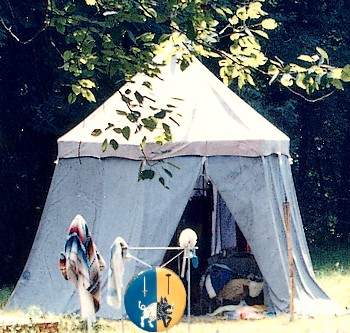
My pavillion design (see figure 1) has a single center pole (no side poles) and no external ropes (also know as "trip lines"). It not only looks good, it is also historically accurate (except for materials), moderately waterproof, can easily be set up by two people, and is not impossibly heavy to lug to the the camp site.
Making the Center Pole
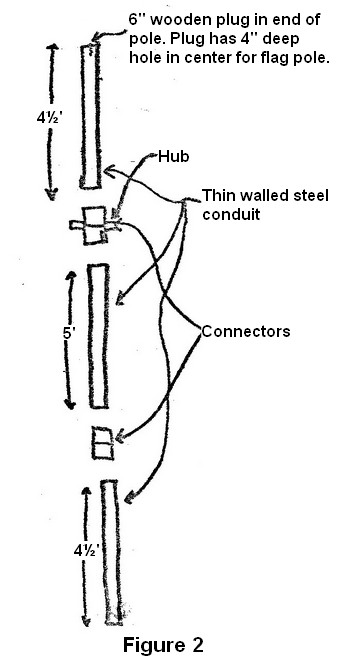
The central pole (see figure 2) is made out 3 pieces of 1½″ O.D. thin walled steel conduit. The pieces are joined together with steel tubular connectors. (Do not use cast metal connectors, these are not strong enough!) A shaped wooden plug is inserted in the top of the upper piece to hold the flagpole. This plug should fit snugly into the top of the centerpole, but be wider at the top so that it does not get pressed down into the pole when the fabric is tensioned. Drill a hole into the shaped plug to accomodate the flagpole.Making the Center Hub
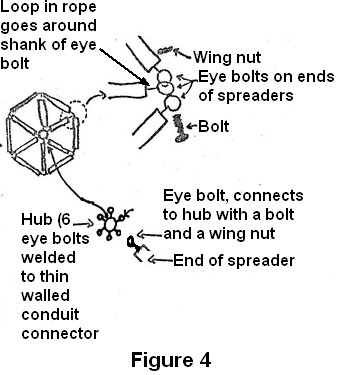
To make the center hub, weld six eye bolts to the steel tubular connector that will be used to connect the upper two center poll segments. The distance between the center of opposite eyebolts should be four inches. If it is not, you will need to adjust the length of the spreaders accordingly.Making the Spreaders
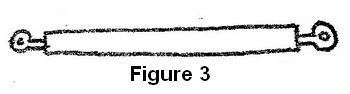
Make 12 spreaders (see figure 3) out of knot free 2x2 lumber, six for the sides, and six that radiate out from the central hub and connect to the side spreaders. The six side spreaders should be six foot seven inches long, measuring between the centers of the holes of the eyebolts that are at each end.
If the distance between the center of opposite eyebolts on the hub is four inches, the length to the radiating spreaders should be six foot five inches. If the distance between the center of opposite eyebolts on the hub is not four inches, the length of the radiating spreaders should be six foot seven inches minus half of the distance between the center of opposite eyebolts on the hub.
Drill a pilot hole in each end and screw the eye bolts in. Adjust the depth of the eyebolts to get the correct total length.
Making the Flagpole
Do not omit the flagpole, it is not simply decorative. The flagpole serves two vital purposes:
- It keeps the top of the pavillion from shifting off-center.
- It holds the ball that diverts rain from coming down the center pole and flooding your belongings.
To make the flagpole you will need a moderately heavy dowel (⅝″ is about right), a ball about 6 inches in diameter (I use a plastic toilet float, painted gold) and, optionally, a banner. Make a hole through the center of the ball. The diameter of the hole should allow for sliding the ball very snugly onto the pole. There should be no gaps between the ball and the pole through which water may trickle down the pole and into the pavillion. The ball should sit touching the top of the pavillion when the flagpole is installed into the hole that you drilled into the shaped plug at the top of the centerpole. Leave enough dowel length above the ball to fly your banner.
Fabric and Sewing
Select strong densely woven fabric for the sides and top. Canvas is a good, period choice. If possible, get wide enough fabric to make sections out of single pieces, it will save a great deal of time. Flat fell all seams. Use heavy twill tape for all ties and loops on the top and sides (the loops in the rope are simply part of the rope). The ties are 12″ lengths of heavy twill tape folded in half with the center 1″ stitched to the fabric leaving two 5″ ties free. The loops are 8″ lengths of heavy twill tape folded in half with the end 2″ stitched to the fabric making a 2″ diameter loop.
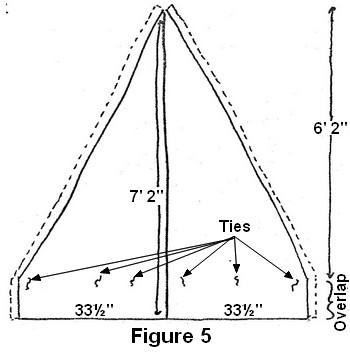
Making the Top
Make six top pieces as shown in figure 5 and sew them together (the ties are sewn to the inside). Cut a circle of fabric 6″ in diameter and cut a 1″ hole in the center. and sew it to the center of the top on the inside as a reinforcement.
Making the Sides
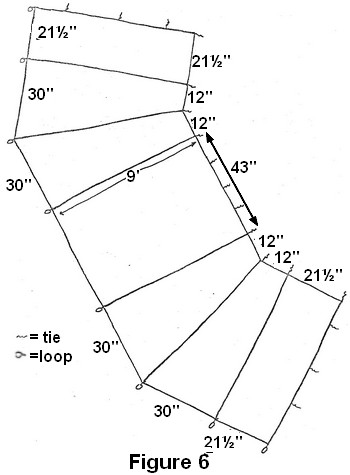
Make three sides as shown in figure 6. The ties are sewn on the top and sides and the loops on the bottom.
Tent Pegs
The best tent pegs I have found are the 12″ bolts that are used to hold cable spools together. A little dumpster diving in areas where new cable is being installed will yield as many of these as you can use. You will need 7 to set up the pavillion.
Waterproofing the Fabric
I strongly recommend that you use a paint on waterproofing, not the spray version. The spray versions are typically intended for light nylon tents and may not be up to the task of waterproofing canvas.
Making the Ropes
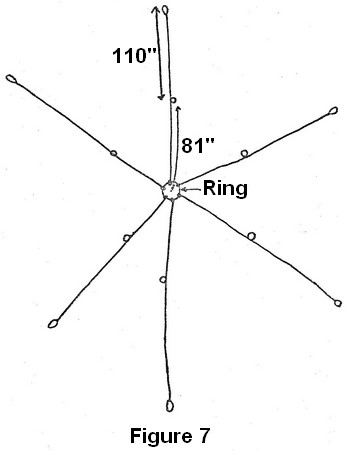
Make the ropes as shown in figure 7. Use a non-stretch rope like sisal or hemp. Don't use nylon or polyester.
Cut three lengths of rope each 33 feet long. Fold each length of rope in half and secure the center of the rope to a sturdy ring with a Lark's Head knot. The ring should be sturdy (it will be under a great amount of tension), large enough diameter to fit, with ropes attached, over the flagpole and a small enough diameter so that it can't slide down the centerpole. Tie a Bowline Knot to make the loops to support the spreaders. Tie a Prusik the ends of each rope to itself. These adjustable loops will go round the tent pegs.
Setting Up the Pavillion
Unlike most tents where the tent pegs are the last step, putting in the tent stakes is the first step in setting up the pavillion. To determine where to put the tent stakes, make a triangle of light non-stretch rope 103″ on a side. Put a small loop into each corner of the triangle. Pound in a stake where you want the center of the pavillion and put a loop over the stake. Put a stake into each of the other 2 loops. Stretch the cord tight and pound in the 2 stakes where you want the opening of the pavillion. Take the loop off one of the outside stakes and measure the position for the next stake. Repeat this process until all six outside stakes are in place. The stakes should be in a very neat hexagon pattern. If they are not, re-measure and fix it before continuing.
Now that the stakes are in place the pavillion goes together as follows:
- Put the hub on the center stake and assemble the spreader. DO NOT FORGET TO PUT THE LOOPS ON THE ROPE ON THE SHANKS OF THE OUTSIDE EYE BOLTS ON THE RADIATING SPREADERS.
- Put the top pole section into the top of the connector, and tighten the screws on the connector to secure the pole.
- Put the top fabric on, but do not tie it to the spreaders yet.
- One person crawls under the top and puts the ring that has the ropes larksheaded to it on top of the center pole. The other person puts the flagpole through the hole in the center of the fabric roof, through the ring, and into the hole in the shaped wooden plug in the top center pole section.
- The person under the top now lifts the top (with assistance from one or more people, if available) and inserts the middle pole section into the bottom of the hub and tightens the screws on the connector to secure the middle pole section.
- Now tie the sides onto the spreaders.
- Tie the top to the spreaders.
- Attach the ropes to the tent stakes and slide the Prusik knots all the way down to the stakes (maximum slack).
- Lift the tent up and attach the bottom pole segment. Tighten the screws in the connecter to secure the bottom center pole section.
- Tighten the tent ropes by sliding the Prusik knots up the ropes.
- Congratulations! Your pavillion ready for medieval adventures!
Pavillion at a Quest