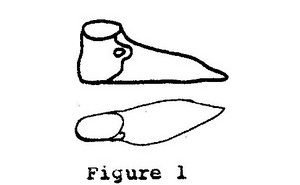
Several types of medieval shoes are easy to make. This page tells how to make the easiest (and most common) type, the "center seam" shoe. Paintings record veriations ot this shoe from the 800s through the 1500s and from the British Isles to Byzantium. The basis form of the shoe is shown in figure 1.
To make a pair of shoes you will need:
- One brown paper shopping bag (or equivalent).
- Bright colored felt tip pen.
- Sissors heavy enough to cut leather.
- About 2½ square feet of leather (read rest of this how-to and make your pattern before buying).
- Leather punch.
- Waxed lacing thread.
- 2 heavy sewing needles.
- 2 buttons.
Making the Pattern
The first step in show making is to fit your basic pattern. Two people are required for this step, one person who is having the pattern fitted to his or her foot, and the other person who is fitting the pattern. The reason that one person can not do this step for him or her self is that when you bend over your foot changes shape. A pattern fitted to this altered shape will not fit your foot properly. The best thing to do is find someone else who wants a pair of medieval shoes and work together.
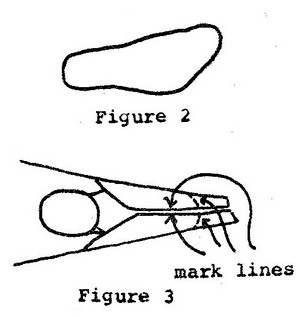
Put on (bare!) foot down near the center of a large sheet of paper (e.g. cut open brown paper bag) and have someone draw around it. The line should closely follow the outline of your foot but not undercut the instep or outline the toes (see figure 2). Next wrap the paper arpund the front of your foot. The paper must fit snuggly around the front of the foot from the toe to the front of the ankle. The two sides of the paper must meet in a streight line from the middle of the ankle to the center of the second toe (the one next to the big toe). Mark this line on both sides (left and right, not top am bottom). Next, holding the two sides of the paper together, form the paper down around the toes and mark (see figure 3).
Fitting the Pattern
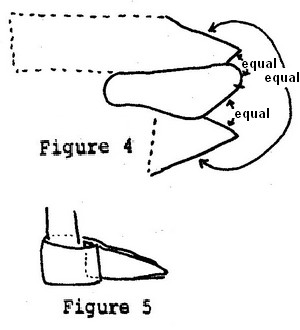
Take your foot off the paper. Using the lines you have drawn as guides, cut the paper as shown in figure 4. Put the paper back down and have the person stand on it again in as close to the exact same position as possible. Form the paper around the foot as shown in figure 5. Adjust the pattern as required (cutting off paper or taping on as needed) to fit closely to the foot. If much taping on of paper is required, something is wrong with the initial fitting and you are probable better off starting over (paper is cheaper than leather and a taped together pattern frequently is not really flat and thus won't do the right thing when transfered flat to the leather).
Checking the Basic Pattern
Three areas must be checked on the basic pattern before you consider it complete. Check that the ditances are the same, :
- Top and bottom on the left side of the toes,
- Top and bottom on the right side of the toes,
- Left and right sides of the center seam.
If any of the measurements do not agree, DO NOT ADJUST BY GUESS! Go back to Fitting the Basic Pattern and try again.
Extending the Pattern
The basic pattern you have just made can be extended into a wide variety of different shoe styles. For the sake of simplicity only the easiest and most common style, the basic pointed toe will be described.
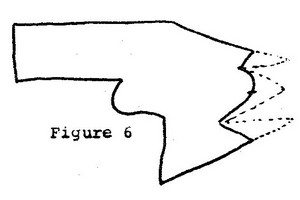
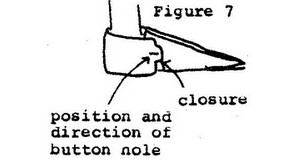
Trace your pattern onto asnother sheet of paper. Save the your basic pattern in a safe place. Extend the toe of the pattern as shown in figure 6. Cut out the pattern and fit it as described in Fitting the Pattern. While the pattern is on the foot mark and cut the closure as shown in figure 7. Check the pattern as described in Checking the Basic Pattern.
Cutting The Leather
Select a piece of soft but sturdy leather large enough to make a pair of shoes. Trace a left and right pattern (i.e. use the pattern both ways up) onto the leather. Do not add anything extra as a "seam allowance". Leather stretches, the seams take up about the right amount of space to compensate for this.NO MATTER HOW MUCH BOTH SIDES OF THE LEATHER LOOK ALIKE, DON'T MAKE TWO LEFT (OR RIGHT) SHOES. Cut out the shoes.
Punching the Holes
Mark holes to be punched around the toes, up the center, and around the heel of one shoe. The holes should be spaced about ¼ inch apart. MAKE SURE YOU MARK THE SAME NUMBER OF HOLES ON BOTH SIDES TO BE SOWN TOGETHER. Punch the holes using the smallest size punch you have available. Using the shoe you have already punchedas a pattern, mark the other shoe and punch it.
Stiching the Shoes
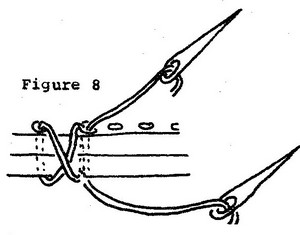
Two verions of the same stich are used to sew the shoes. To do this stich, take a length of tacing thread that is four times the distance that you need to stich plus two inched for tying off. Put a large sewing needle at each end of the thread. Put one needle through the first hole. Holding BOTH needles, center the thread, Stitch by crossing one needle over and through a pair of holes followed by brossing the other needle over and through the same pair of holes in the other direction (see figure 8).Working with the shoes turned inside out, stitch the toes together (starting from the outside and working toward the center on each side). Next sew the heel together, starting from where the leather comes together and working toward the closure.
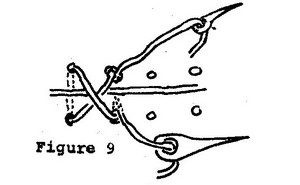
Turn the shoe right side out. Sew the center front seam using the same stitch as you have been using except that the leather is butted together insteaded of overlapped (see figure 9). The crossover should be on the outside. (This seam may be done decoratively using gold or silver cord if desired.)Adding the Buttons
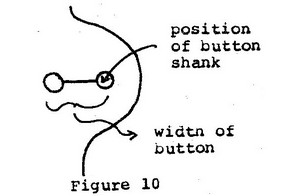
Put on the shoes. Have a second person mark the position for the button hole. The hole must be marked with stress on the leather (see figure 7). Take off the shoes/ Punch and cut the button hole as shown in figure 10. Put the shoes back on. Have a second person mark the position for the shank of the button at the end of the button hole as shown in the last figure. Take off the shoes. Punch a small hole about ⅛ inch above and below the mark. Sew on the button.